How To Make Newspaper Pots For Seed Starting: An Easy and Inexpensive Garden DIY
Newspaper Pots for Seedlings: An Easy and Inexpensive Garden DIY
Newspaper pots are a great DIY for seed starting. They’re inexpensive, great for seedlings, and biodegradable. Plus, they’re super easy to make!
Instead of investing in all new peat pots each year, I have switched to newspaper seedling pots and I’ll probably never go back.
There is a wooden pot maker tool that you can buy to make the little pots, but it’s not necessary. I will be sharing a tutorial for making them using a small can or jar. The ones I made for the images in this post I made using a small votive holder. Any small jar will work, about the size of a small can of tomato paste. These newspaper seed pots are so easy to make, I work on them while watching tv in the evenings.
But before we get to the tutorial, let’s discuss the benefits of newspaper pots.
This post may contain affiliate links. You can read my full disclosure policy here.
Are newspaper pots good for seedlings?
Newspaper pots are not only a biodegradable, inexpensive alternative to plastic seed trays, they’re also good for plants. Newspaper pots prevent shock to the roots of tiny seedlings by placing the entire pot into the ground without disturbing the roots. The newspaper will eventually break down, and the plant will settle in and spread its roots.
To break it down further…
Are newspaper pots are biodegradable?
Yes, since newspaper is biodegradable, it makes great biodegradable pots. The pots should break down in the garden within 2-6 weeks. The ink used on newspapers is a water or soy-based ink, which is safe for your garden. Additionally, biodegradable seedling pots prevent the use of disposable plastic pots that could potentially end up in landfills.
Are newspaper pots good for plant roots?
Newspaper pots are a great option for seeds, because they prevent the disturbing of delicate roots during transplanting.
With traditional plastic pots, the plants must be removed to plant into the ground. This exposes the root system to air, and causes what’s known as “transplant shock.”
Transplant shock can set back growth in plants by days or weeks, as the plant halts growth in order to recover. In extreme cases, plants can die from transplant shock.
With newspaper pots, the whole pot can be planted directly into the ground. This prevents the roots from being disturbed, and growth from halting during transplanting.
What are the benefits of newspaper pots?
Newspaper pots are not just good for your plants and the environment. They’re also a great way to save money gardening.
One of the reasons I started growing from seeds is to reduce my spring gardening costs. I was buying flats and flats of tiny plant starts, and the prices weren’t getting any lower.
Eventually, this led me to starting plants from seed and I’ve never looked back. Each year I start more vegetable and flowers from seed, and I love that these pots reduce costs even more. I have a friend who supplies me with a stack of old newspapers, and I keep a stash just for seed starting.
Another benefit to newspaper pots is that they’re a fun garden DIY to do with kids. Rolling and making the pots is an easy, hands-on activity and kids love to plant and watch seeds grow!
How to make newspaper pots for seed starting
Let’s get started with the tutorial!
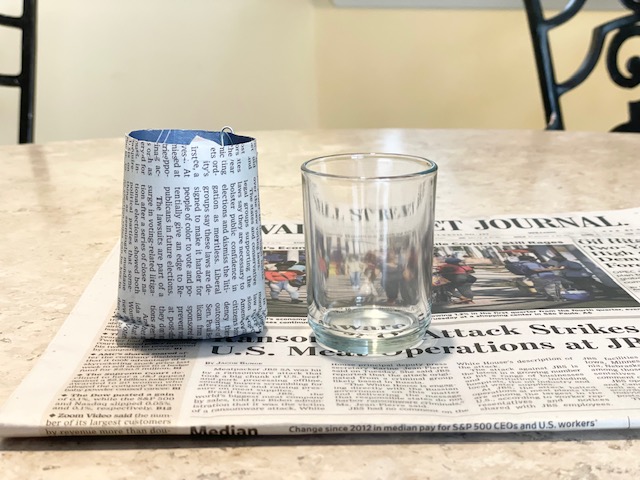
To make these pots, you’ll need several sheets of newspaper and a small cylindrical object, such as a small can or glass jar. A 4 ounce can of tomato paste is perfect, but I use a small, straight-sided votive holder. You want it to be 1-2 inches in diameter, and at least 3 inches tall.
To make a newspaper pot:

Open a full sheet of newspaper and cut it down the middle into two strips.

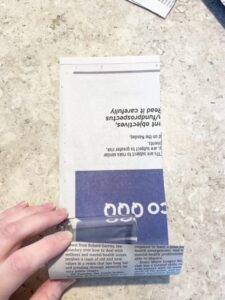
Take one strip of newspaper and fold it in half, top to bottom.
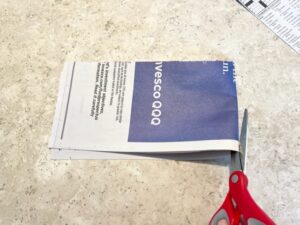
Cut that piece of in half on the fold.
Lay your mold (the can or small jar) on the paper, with the bottom of the can lined up with the edge of the newspaper. The open end should be laying an inch or so from the other edge.
Start rolling your mold away from you, rolling the paper with it. You don’t want to roll too tightly, or you’ll struggle to slide the mold out. Slightly loose is okay here.
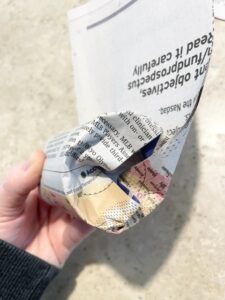
As you roll, slightly fold the paper into the open end of your mold. Continue this all the way to the end of your paper.
At this point, I like to roll the mold around on the bottom seam a few times. This really presses the folds into the bottom of your pot.
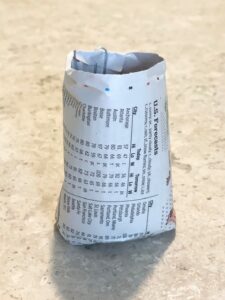
Carefully remove your mold from the pot and behold your tiny seed starting pot!
Now this is where my tutorial will differ from other tutorials. Maybe it’s because I lack some special ability, or other tutorials are hiding their beginner struggles.
My newspaper pots do not stay shut when they’re dry.
Once things are full of soil and the newspaper is wet, things are fine. But after freshly rolling and removing from the mold, my finished pot opens up.
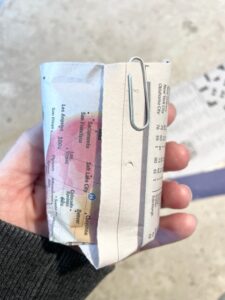
I solve this by slipping a paper clip over the seam until the pots are planted up. When they’re damp and holding together on their own, I simply remove the paper clips and reuse them again in the future.
Fill them with seed starting mix (you may like to try my DIY seed starting mix recipe) and set them in a waterproof tray.
I use a 10 20 seedling tray for my newspaper pots. I have these ones and they’ve served me well. I can fit 30+ seedling pots in each tray, depending on how big I make them.
Note: To make a bigger pot, simply use a larger mold for rolling your newspaper pot up.
Related:
How Long Do Vegetable Seeds Take To Sprout?
Free Printable Seed Starting Chart
The Winter Sowing Method: A Complete Guide To Getting Started
For more DIY and upcycled seed starter pot ideas like this one, be sure to check out my 27 DIY seed starting pot ideas list. It includes newspaper pots, pots from toilet paper rolls, egg cartons, and more!
How long will newspaper pots last?
Newspaper pots should last you 6 weeks or so, until it’s time to get them in the garden. Once the pots are in the garden, they should break down in a few short weeks.
They may not be as fresh and sturdy near the end as they were when you first made them, but they should hold up until planting time. The trick is to not handle them any more than you need to.
How do you water newspaper pots?
Watering seedlings in newspaper pots is the same as watering other seedlings. I use a spray bottle to mist my seeds until the sprouts emerge. After that, I water from the bottom of the pot by filling the trays with just enough water to soak the top layer of soil. You want your seedlings to be in moist, but not wet or dry, soil for best results.
Do newspaper pots grow mold?
This is something I’ve seen discussed but fortunately have not dealt with yet. However, it would make sense that the newspaper could grow mold as wet newspaper starts to decompose.
One way to avoid this is to keep your pots moist, but not wet, and allow space in between them.
If you do encounter a white, fuzzy mold, it shouldn’t harm your seedlings.
If you have any further questions, please leave them in the comments!
Happy Growing!
As an Amazon Associate, I earn from qualifying purchases