
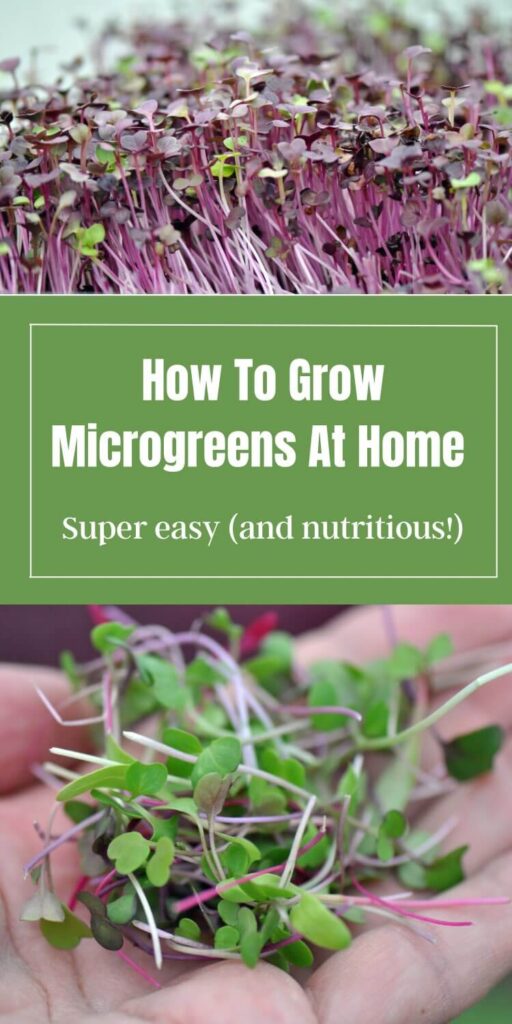
How To Easily Grow Microgreens At Home

How To Easily Grow Microgreens At Home
Microgreens are becoming popular with home gardeners lately, and for good reason! Not only are they far more nutritious than their mature counterparts, but they’re also super easy to grow and can be grown indoors year round. Microgreens can run $5 or more for a small plastic bag of them at the market, but in this post I’m going to show you how to grow your own microgreens at home, for far less money.
This post may contain affiliate links. You can read my full policy here.
What are microgreens?
First, let’s discuss what microgreens are, and how they differ from sprouts and baby salad greens.
Microgreens are the young seedlings of edible greens, and they are full of vitamins, minerals, and antioxidants. Microgreens are harvested 7-14 days after germination, when they are about 2 inches tall. They can be used as a garnish is salads, soups, and sandwiches and they add a spicy or sweet flavor, depending on the type of seed grown. Microgreens are far more nutrient dense than the mature plant, and are great for growing in small spaces.
How are microgreens different than sprouts and baby greens?
Although both microgreens and sprouts are young seedlings harvested for their leaves and stems, sprouts are typically harvested earlier than microgreens. With sprouts, the entire seedling is consumed, including the roots and seed coating. Microgreens, however, are trimmed at the soil line, and only the stem and leaves (cotyledons) are eaten.
Additionally, sprouts are germinated in water, while microgreens are grown in potting mix or other growing medium, such as coco coir.
Microgreens, being more mature than sprouts, have more flavor and nutrition. This is because they have had more time to develop chlorophyll, vitamins, and minerals.
Finally, microgreens have more flavor, color, and texture options than sprouts, making them a more versatile option in your kitchen.
Baby greens, on the other hand, are more mature than microgreens. They are typically harvested at 4-6 weeks old, and are larger, with a milder flavor, than microgreens. Baby greens also have a more tender texture than microgreens and can be used as a base in salads and various other dishes. Baby greens are the baby plants of fully mature leafy greens.
As far as nutritional content, sprouts, microgreens, and baby greens are all considered to be very nutritious, with high levels of vitamins, minerals and antioxidants.
What are the benefits of growing microgreens at home?
- Freshness. Growing microgreens at home means the freshest supply possible. Instead of purchasing them after they’ve been sitting on store shelves, just to have them sit in your fridge, you can harvest them as you use them. This means your microgreens will retain more of their color, flavor, and nutritional value compared to store bought greens.
- Convenience. Growing microgreens at home means you have a constant, fresh supply whenever you need, without a trip to the grocery store or farmer’s market. You can also be sure your favorite variety is always in stock. Plus, they’re easier to grow than their mature counterparts, taking up less room and growing with just the light from a sunny windowsill or grow light.
- Nutritional value. Microgreens are full of nutrients, including vitamins, minerals, and antioxidants. By growing microgreens at home, you have control over the growing conditions and supplies used, ensuring they are grown organically and free from chemicals.
- Cost savings. Microgreens can be expensive to purchase from the store or market and are much cheaper to grow at home. For comparison, at the time of this writing, my local grocery store has a 5oz container of microgreens on sale for $3.69. They also have a packet of Burpee micro green seeds for $1.99, which is enough to grow several 5oz containers worth of microgreens. Additionally, microgreens have a very short shelf life, lasting only a couple of days in the fridge. Growing your own ensures an always fresh supply that can be harvested as needed, reducing food waste.
- Variety. Growing microgreens at home allows you to experiment with different types of seeds and growing conditions, giving you the opportunity to grow a wide variety of flavors, colors, and textures.
How to grow microgreens at home
To grow microgreens at home, you will need a few basic supplies, some of which can be reused indefinitely.
Materials needed:
- Microgreens seeds if your choice (I love this collection)
- Potting soil, seed starting mix, or coconut coir
- Vermiculite (optional, for covering seeds)
- Seed tray or containers with drainage holes (I use these 1020 trays)
- Grow lights or a sunny window
- Spray bottle
- Plastic wrap or clear plastic dome lid
- Heating mat (like this one)
- Scissors, for harvesting ( like these floral scissors)
To grow microgreens:
1. Choose your seeds. There are many types of seeds suitable for microgreens, including radish, cabbage, sunflower, peas, and beets. Different types of seeds produce different flavors, textures, and colors. I personally prefer blends that include radish, cabbage, and broccoli. Experiment with several types until you find your favorites. I’ve linked to my favorite microgreen seeds further in this post.
2. Prepare your containers. Fill your growing tray or containers with your potting soil or seed starting mix and spread it evenly across your container. Spritz it thoroughly, until the entire mix is moist but not wet. Be sure there are no dry pockets under the surface. Alternatively, you can add the seed starting mix or potting soil to a bowl and mix in water until it is moist, but not wet, and then spread it evenly in your container.
3. Plant your seeds. To plant microgreen seeds, sprinkle your seeds evenly across the soil surface. The spacing should be according to the package instructions, but it’s okay to crowd them a bit since we won’t need the space for them to grow to maturity. After you have spread them evenly, cover them with a bit of vermiculite or more potting soil or seed starting mix.
4. Water and cover. Mist your seeds one final time with a spray bottle, making sure the soil is good and moist, but not wet. After the soil is moistened, cover the tray or container with plastic wrap or a dome. This will help hold in moisture and keep your seeds from drying out.
5. Provide light. Microgreens need light to grow, but they are much more forgiving than seedlings you’ll be growing to maturity. If you don’t have a set up with grow lights, a sunny window will work just fine. Microgreens need at least 4-6 hours of sunshine each day. If you notice your microgreens struggling to germinate and grow in a window, they may need to be moved under lights.
6. Care. Microgreens will be ready for harvest in 14-21 days, but they’ll need a bit of care in the meantime. Check the seed trays daily, and if the soil seems dry, mist with the water bottle. Avoid watering from above with a watering can or similar container, which can cause splashing onto your microgreens. You’ll also want to avoid overwatering, which can cause root rot.
7. Harvest. microgreens are ready to harvest when they’re first set of leaves, called cotyledons, have opened up but before their first set of true leaves are mature. This is usually after 14-21 days, or when the microgreens are 2-4 inches tall. To harvest, snip your microgreens with sharp, clean scissors just above the soil line. Rinse your microgreens well, drain and pat them dry with paper towels. They are now ready to use! Use them in place of lettuce on sandwiches, as a garnish on salads, or stir them into soups.
How to store microgreens
Microgreens can be harvested as needed, and each week or two a fresh batch can be planted. After harvesting, be sure to wash your micogreens under cool water. Pat them dry with paper towels to remove excess water, or run them through a salad spinner.
If you harvest too many at one time, or end up not needing them, microgreens can be stored in the refrigerator for 1-2 days. After washing and drying them, store them in a glass container.
Harvested microgreens can quickly grow mold, so it’s best to toss any unused greens after a day or two.
How to use microgreens:
- Top your favorite salad
- Stir into your favorite soup
- Use in place of lettuce in sandwiches
- Add them to stir fry’s
- Juice them
- Add to smoothies
- Use them to top avocado toast
- Add them to veggie bowls
- Garnish pasta dishes
- Make microgreen pesto
My favorite microgreens
- This Rainbow Sprinkles variety from Johnny seeds
- This Mild Mix from Botanical Interests
- This Microgreen Collection from Botanical Interests
There you have it! Now you can successfully grow your own microgreen seeds from home and avoid the trip to the store for expensive packs of microgreens.
You may also like:
- DIY seed starting mix
- How to start seeds indoors
- How to grow spinach indoors
- 15 best seed starting ideas
FAQ
Do microgreens regrow after cutting?
Microgreens do not regrow after cutting. After harvesting your microgreens, the soil medium used to grow them can be composted and fresh microgreen seeds should be started.
What is the healthiest microgreen to eat?
Pea shoots are an exceptionally healthy microgreen, along with cabbage and kale microgreens. Broccoli microgreens and radish microgreens are also an excellent source of nutrition.
How can I check the germination rate of my microgreen seeds?
The easiest way to check the germination rate of your microgreen seeds is with the paper towel method, which involves sprouting seeds on damp paper towels in plastic bags. You can find out more here.
As an Amazon Associate, I may earn from qualifying purchases.


Great information! Thank you!
You’re very welcome! Thanks for stopping by!